ARB Locker Installation
An instillation of an ARB Air Locker in a Dana Model 30 Axle.
Every wheeler knows that having a locking differential can dramatically alter how your Jeep performs on the trail. There are various types of locking differentials on the market today, or lockers as they are commonly called. From full carrier replacement automatic lockers, like the Detroit or the Eaton units, to the drop in lockers like the Lock Rite and the Gearless Locker. There are cable actuated, electronically activated, to air actuated part time lockers. Deciding which one to use can be a tough decision. Your budget is probably the biggest factor that determines which locker to obtain. The most important factor in my decision was the use my axle would see.
I originally had a Detroit Soft locker in my rear axle and a Detroit EZ-Locker in my front axle. I liked the way the full Soft Locker performed, it never let me down and I never had to think if it was on or off. It was always there. However, I did have a problem with the EZ-Locker up front. It never failed me as a locker, but trying to turn the steering wheel with all 4 tires locked up was never an easy task. It would make me take turns so wide that I would sometimes crawl over near impossible obstacles to just get hung up trying to make a turn. Driving in the snow was another issue; with both front wheels turning there was no anchor for the locked rear axle. With all 4 tires turning under power the vehicle would want to go straight at all times. I performed more steering with the throttle pedal than I did with the steering wheel at times. Taking a left hand turn, going down hill, on an ice-covered road can be a hair-raising experience.
 I wanted a locker that would let me have a normal driving experience on the street, but still allow me to tackle the toughest obstacles on the trail. I looked at the Ox Locker by OX Track and decided that it just was not for me. I looked at a couple of other models of lockers such as the Eaton electric locker and the new Elocker from Tractech. They had no applications for my Dana 30 axle. This left me with one other choice, the tried and tested ARB Air Actuated Locker. This would allow me to have a locked or open front axle, for trail or for the street, at the touch of a button. There is an ARB application for just about every axle and axle combination on the road today.
How the ARB Air Locker functions:
The ARB Air Locker is an air operated, driver controlled differential lock activated by pushing a dash-mounted button.
When the dash mounted button is pushed, compressed air, delivered by the ARB 12 volt, on-board air compressor is passed via a 12 volt solenoid down an air line into the differential housing. The air travels into the differential center via a specially designed seal housing which seals against an extended bearing spigot.
Via air galleries, the compressed air enters the piston chamber and actuates the piston and clutch gear, moving the gear into the locked position. The clutch gear now locks the side gear to the differential housing instantly stopping any differential action. The diff is now 100% locked, and both axles will deliver 100% traction.
To disengage the differential the dash mounted switch is again pushed, which releases the compressed air via the solenoid and the piston springs return the piston to its original position. The differential is then fully open allowing full, standard differential action.
The ARB Air Locker only takes a split second to engage, making it the only, truly driver controlled, differential locking system.
Air Source:
Since the ARB Air Locker is air activated, I needed to have an air source. You can get air from any form of on board air, just as long as it can generate the psi needed to activate the locker. I chose to use the ARB Air Compressor to provide the air source for my locking differential. The main reason for my choice was the simple and quick install. The compressor comes with its own pre-terminated wiring harness and it is already preset to run the locker at the required air pressure. In the future I plan to have a separate on-board air for air tools and tire inflation. With both systems, I will have a backup for my air locker if one of the compressors fails.
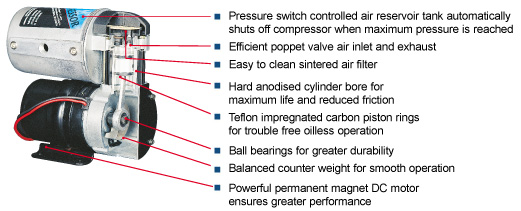
ARB Compressor Features:
The Installation:
I had removed the stock housing and disposed of it since it was obviously bent from years of abuse. I had aquired a replacement housing and started the long process of tearing it down and cleaning it. Once the housing was clean the next step was to torch off all the factory attachments such as shock mounts and spring hangers. This is not necessary for the locker install, but I was also doing a spring over conversion at this time and would explain the missing items from the pictures. Once this was done I painted the axle and proceeded to clean out the differential area and the tubes. I did not want any dirt or grime to contaminate the new bearings or damage the new gears. I chose to go with Superior Gears in the ratio of 4.56. This would match the rear ratio and give me decent highway power with better off-road gearing.
In the picture you can see that the ARB Locker comes with the actual locking carrier itself, the switch, air solenoid, special air fitting, all the parts needed for the air line to connect to the solenoid and the bulkhead fitting on the differential housing, special bearing and shim pack. The kit also includes a substantial length of blue air line for the locker itself.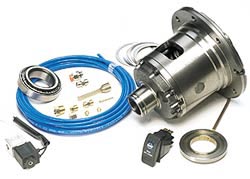
 Once I had everything clean my partner, Dave Kemner from Full Circle Performance & Off-Road, looked the axle over and started assembling the parts for the installation. The first problem he encountered was that the old gear set was not in the axle, and he did not even have the shims for the old gears. This gave him starting point for setting up the new ring and pinion. Me having never installed my own gears before did not know that not having the old gear set would be a problem.
 Dave installed the outer bearing race and then the inner bearing was installed by using a hydraulic press and a piece of tubing. Once this was done then the fun of setting the pinion depth began!
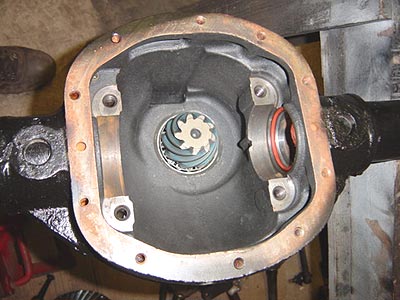 Here you can see the pinion during a test installation before the slinger was installed. A slinger helps hold the oil up around the pinion bearing and is required on many high pinion axles.
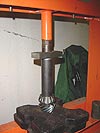
We could now install the ring gear to the ARB locker. Sometimes the ring gear can be very tight and appear to not fit the carrier. DO NOT USE THE RING GEAR BOLTS TO PULL THE RING GEAR ONTO THE CARRIER. A simple trick is to place the ring gear in the oven for a couple hours till it reaches about 350 degrees. This helps the ring to expand and be tapped on to the flange and then be bolted down. Be sure to use thread locking compound on the bolts.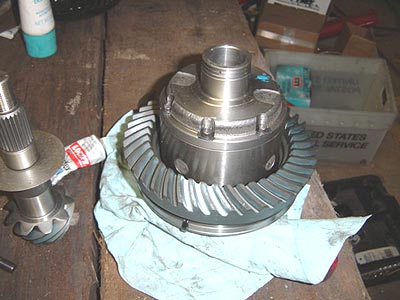
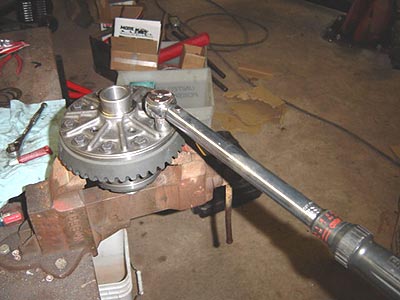 The ring gear bolts are then torqued to the required specifications using a torque wrench.
I went ahead and installed the bearing on the air port side of the carrier. This is where the air enters the carrier through a special sleeve on the carrier ear. Notice the grooves for the O-rings to seal the air in and the gear lube out. There are not shims on this side so attaching the bearing at this point does no harm. Be sure to slide the O rings and not roll them as rolling tends to damage them creating leaks in the future.
Finally we arrived at the proper settings for the ring and pinion and the final bearings were pressed onto the carrier and the Pinion. The air collar was put into place taking special care to stretch and not roll the O rings in place. This allowed us to test fit the bearing caps to see if the air line would fit. On the older ARB models the bearing cap usually needs to be notched or a hold drilled in it to fit the air line. On the newer style ARB's the air collar is positioned so that this is no longer an issue.
After marking the cap we drilled a hole then dressed the hole with a file to remove any burs and to make final adjustments. It's important that you only remove the material needed to fit the air line. Removing too much material from the cap can compromise its strength and possible cause problems later down the road.
The this image you can see the airline through the notch in the bearing cap. We torqued the bearing caps down to the proper torque and tested the gear pattern one more time. Dave being satisfied with the pattern then had to remove everything to drill the hole for the air bulkhead in the housing. Some drill the hole first but Dave likes to do it last to allow him to double check everything during the re-installation of the gear set.
Here is everything removed from the housing and you can see the ratchet tap in the hole drilled for the bulkhead. The hole for the air bulkhead was drilled just above the factory drilled vent hole. The location for the hole differs slightly in every install. The ratcheting tap made this so easy. Simply insert and tap away. The hole was tapped in less than a minute in the soft cast material. Notice all the metal shavings at the bottom of the housing. Do not attempt to drill the hole or tap it with the gears installed. The chance of shavings being trapped in the bearings and causing damage is too high.
Once the hole is drilled and tapped you start fishing the airline through it. You have to be careful and not crimp the copper line, or flex it so much that it breaks. Copper-work hardens so try to bend it as little as possible. The line must be clear of the gear and the carrier, and still fit so it doesn't touch the differential cover. Using a flat screwdriver and a rubber hammer helped us to compress the line just enough to clear the carrier and the cover. It's a tight fit.
Once the airline is bent it is time to assemble the bulkhead fitting on the differential. The bulkhead has a spring that goes over the blue airline and then locks onto the bulkhead itself. This keeps the line from being crimped or snapped if its bent to far to one side during articulation.
Now that the locker wsa installed we needed to install the ARB compressor to power the locker. The ARB Air Compressor comes with the switch, relay and wiring harness, and also a pressure switch. The pressure switch is very important, as that is what lets the compressor recharge itself after the charging of the air locker. The tank has three air fittings. Two are for air solenoids and one for an air manifold for a tire inflation kit or something similar. The air compressor attaches to the battery directly. To activate the compressor the harness attaches to a keyed ignition source. The harness for the compressor also has provisions for the ARB Locker switch for front and rear axles. The harness does not allow the locker to activate unless the compressor is turned on and also to activate the front locker unless the rear locker is engaged first. This feature is disabled when running just the front ARB with no rear ARB Locker.
The air compressor comes with excellent directions and wiring diagrams for installation. I mounted the compressor where the factory tire jack used to reside. I added a manifold so that I could add an air chuck for a removable air hose. I wanted the extra hose so I can fill a small tire, or an air mattress when I want to. The compressor just plugs in to the preterminated harness, as does the airline once you install the solenoid and the fitting pack.
I mounted the front ARB Air Locker switch to the left of my center dash section. This allows me to tap it on or off when I'm in low range first gear with just a reach of my finger. I put the air compressor switch more out of my reach, as I did not want the chance of accidentally turning the compressor off when I want to turn the locker on or off. Turning the compressor off automatically disengages the locker. This could be bad depending on the situation your in. This set-up also leaves room for another switch if I wish to install a rear ARB Air Locker at a later date.
Final Impressions
The installation of the ARB was more time consuming than it needed to be, but that was my fault for not getting the housing with the old gears still installed. The installation required specialized tools and I would not recommend it for your average home mechanic. The installation requires the adjustment of the backlash on the ring gear, even if you were not installing a new ring and pinion such as I was.
The ARB instructions are very specific, and are some of the best I have seen of any product offered in the aftermarket. The instructions offer the step-by-step process with warnings and helpful hints to make the installation as easy as possible. One thing that I would stress is the use of Teflon tape for the connections on the air bulkhead, so fluid doesn't leak out of the differential, and the air solenoid so you don't lose air pressure. I had issues with leaks for the first few days and the compressor would cycle on and off in short intervals to maintain pressure. I went back and reapplied Teflon tape to all the connections and this solved my leak problem. This can leave you stranded without a front locker in a bad situation if not addressed.
Using the air locker is a dream come true. I can cruise around the trail making all the sharp turns I want, and not having to worry about breaking my arms trying to turn the wheel. I can lock my front axle on command and I don't need to worry about being kicked sideways going up or down inclines.
Once your locked, you can find all kinds of different ways to get yourself into trouble. The biggest adjustment I have had to make is keeping in mind that I can turn the locker off or that I can turn it on. I kept getting into situations where I would forget that it was turned off and I would lose forward progress. Once you have your first test run go back and recheck all your fittings and the travel of your airline. I found that my airline was chaffing on the intake manifold, so I used a piece of wire loom to prevent any further damage.
Article by James "Mudjocky" Buckley.


